
Gmail limits email forwarding to one address, but we’ll show you how to enable forwarding to multiple addresses in Gmail using filters—fast, free, and reliable.

Summary: Gmail doesn’t let you forward emails to multiple addresses by default, but you can workaround it with filters and forwarding rules.
Update (June 2025): This workaround is working as of June 2025. If it stops working for you or you’re having issues setting it up, let us know in the comments!
Producing Paradise is all about peering behind the magic curtain: we’re using this blog as a testing ground, and telling you how we make it work. I’m going to explain how we hacked our Gmail setup so we could share the main Producing Paradise email address, without having to log into a new account to check for new mail. Because who has time for that?
A free Gmail address suited us because we’re all familiar with the platform, and it means we can login from anywhere, on any device. It’s weareproducingparadise@gmail.com BTW, if you want to drop us a line 😉
We didn’t need a domain-matching email (like hello@…) either — this is a side project, and hosted email costs money.
Here’s the video overview (3min):
Video summary:
0:13 Use case
0:30 Gmail settings
0:44 Add forwarding address
1:22 Disable forwarding
1:36 Filter setup
1:43 ‘deliveredto:’ filter explained
2:08 Repeat per recipient
Psst… if you’re sorting out email to stay on top of things, you’ll love our Notion setup for freelancers. It’s how we keep projects moving, tasks tracked, and everything in one place 😉
Forwarding to multiple addresses in Gmail
Let’s take you through the steps!
Here’s what you’ll need to do:
1. Create a Gmail account — the one you want to forward from
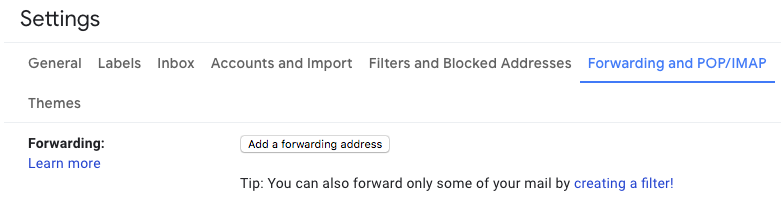
2. Log in and click the cog icon to open Settings
3. Go to Forwarding and POP/IMAP > Add a forwarding address
4. Add each email you want to forward to
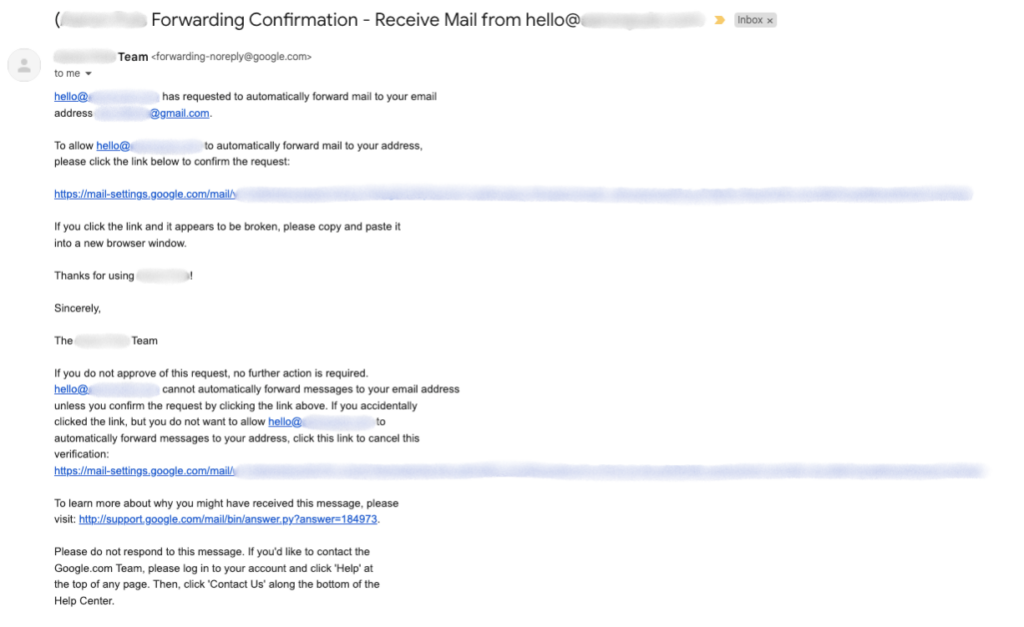
5. Verify each forwarding address by clicking the confirmation email they receive
6. Once verified, go back to the Forwarding and POP/IMAP page and make sure it looks like this:

Noting:
- Forwarding is disabled — because we’re going to make it work using ‘Filters’
- POP and IMAP are disabled — because we don’t want anything we do in our personal email account to affect the original
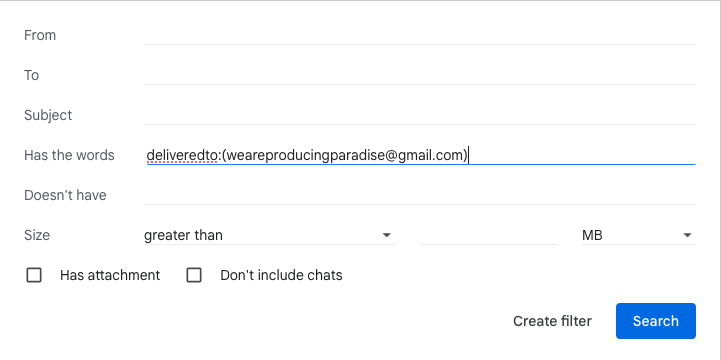
7. Go to Filters and Blocked Addresses > Create a new filter
8. Filters are a way to search through emails, but in this case we want the filter to apply to ALL emails, so in the “Has the words” field type “deliveredto:[main email address]” then Create filter
9. After that, you get to choose what happens to all filtered messages, so in this case: Forward it to the first forwarding address
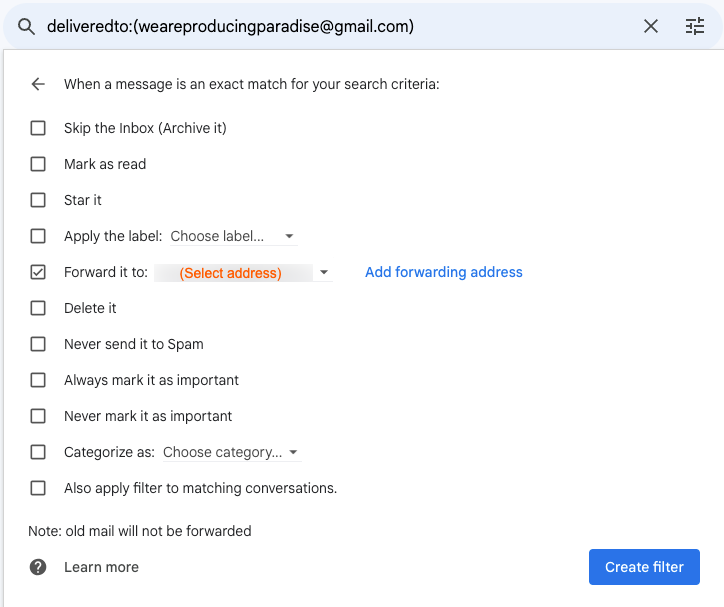
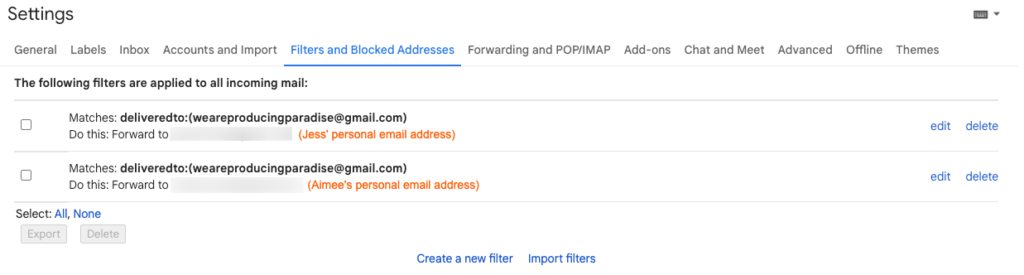
10. You’ll need to repeat this step and create a new filter for each of the forwarding addresses, until it looks something like this:
Send an email to the original address to make sure it’s all doing what it’s supposed to.
The forwarded emails act as notifications, which can either be kept as a reminder of an action required (in your @Action folder, if you’re that way inclined) or deleted immediately (since they will still exist in the main Producing Paradise email account).
Psst… this post has been updated! The original instructions used the basic ‘to:(youremail@gmail.com)’ filter but the newer method uses the field ‘Has the words’ and ‘deliveredto:(youremail@gmail.com)’ so that it will forward emails that have been received via BCC or CC as well.
And that’s it!
So far, this system is working for us. It took a bit of Googling and some annoying steps (like waiting for each person to verify their email address, since we weren’t altogether when setting it up) but now it’s in place we all get the Producing Paradise emails sent to our personal accounts so we’ll see them without having to log into a separate email account. And it made for another tidy little blog post, in the hope it may be helpful to someone in the future (…you, perhaps?).
Hold on, what about replying?
When one of these forwarded emails lands in our personal inbox and we need to reply, we tend to either:
a) Reply from our own email address, and BCC weareproducingparadise@gmail.com so everyone can see that it’s been dealt with; OR
b) Login to the dedicated Google account for weareproducingparadise@gmail.com, and reply from there (e.g. if we want to keep our personal email address private).
It depends on what it’s about / who we’re responding to.
Pro tip: If you don’t want to get logged out of your personal Google account, most browsers offer a Private browsing option (e.g. in Chrome go to File > New Incognito Window) which can be used if you need to quickly login to another account.
Another option: Set up the forwarding email as one you can “Send mail as” in the Gmail settings page of your personal email account (under Accounts and Import; and choose ‘Reply from the same address the message was sent to’). This will avoid having to log in and out of the shared account, and keep your personal email address private after you’ve setup forwarding to multiple addresses in Gmail. Nifty!
Pro-tips on email management
If these instructions were helpful, you might also be interested in:
- my email management principles (the basics);
- find the email you need with these Gmail search tips;
- how I setup (and stick to) Inbox Zero;
- how to change the default Gmail snooze times; or
- how I use Trello to manage my to-do list …instead of using my emails as a task list 😉
…and check out the Producing Paradise YouTube channel for many other quick pro-tips!
Email hacks aren’t enough. Build systems that make your whole business flow.
Managing your inbox is a great start, but real productivity comes from having simple, consistent systems that support everything you do.
The Organised Creative Notion Template
A ready-to-use Notion workspace with built-in workflows, task prioritisation, and project tracking. Designed for freelancers who want structure without the setup time.
EXPLORE THE TEMPLATE →
The Most Organised Person I Know
A practical guide showing how to design simple, connected systems that reduce mental load and help your whole business run more smoothly. From email to client work to long-term planning.
GET THE EBOOK →
When your systems are working, you don’t need to overthink every task. You get on with it.
I’ve followed your instructions and added and verified the email addresses. Setup the filters as described and they work all the time with one email address and will only work one time with the other email addresses, they work the first time after the filter has been setup and then never again. Has anyone else run into this issue?
Solved, I ended up using a third party email program (Thunderbird) to create the filters and they now work. Using the online gmail to create the filters would not work for me.
Hi Marie, that’s very strange!
Glad you’ve been able to find a workaround, but in case you run into this issue in future the things I would check are below:
– The ‘official’ forwarding system is turned OFF (so filters are the only forwarding mechanism in play)
– All forwarding recipients have clicked the initial approval email (to allow receipt of forwarded messages)
– All forwarding recipients are in the ‘contacts’ list of the main account, and vice versa (because being known contacts of each other can help ensure messages aren’t classed as spam)
– The person sending the test email is a DIFFERENT account to the one you’re forwarding to (because there are some smarts in there to stop messages from being sent to the person who it came from)
Failing all of this, I’d have to have a closer look at your particular setup. Thanks for taking the time to share your solution anyway 🙂
My IMAP choices are not the same as yours and I can’t get the forwarding to work. The following have check boxes under each heading.
IMAP access:
(access First Congregational UCC – Eugene Mail from other clients using IMAP)
Learn more
When I mark a message in IMAP as deleted:
Auto-Expunge on – Immediately update the server. (default)
Auto-Expunge off – Wait for the client to update the server.
When a message is marked as deleted and expunged from the last visible IMAP folder:
Archive the message (default)
Move the message to the Trash
Immediately delete the message forever
Folder size limits
Do not limit the number of messages in an IMAP folder (default)
Limit IMAP folders to contain no more than this many messages 1,0002,0005,00010,000
Configure your email client (e.g. Outlook, Thunderbird, iPhone)
Configuration instructions
Suggestions?
I had the same situation but pressed on anyway.
Adding the individual filters seemed to take a long time to respond.
Eventually, I had one added and appearing under
The following filters are applied to all incoming mail: under the Filters and Blocked Addresses tab
I then EXPORTED to a file mailfilters.xml
I was able to edit in Notepad++ to replicate the group of lines from
Mail Filter
<apps:property name="forwardTo" value=[email address in the filter]
to
for each additional forwarding email address
Then
imported the file using the Import Filters Button
This quickly loaded the forwarding filters in bulk.
Thank you Producing Paradise for guiding us through this.
Ah, I think it looks different for business accounts as Denise was describing (thanks for the detailed instructions here!).
I don’t think the pop or IMAP settings actually matter, but if you’re not seeing a ‘Forwarding’ heading it may be that your account administrator has banned forwarding. The filter-forwarding method will only work if forwarding is allowed on your account, that would be my best guess for it to not be showing up here, if you can’t see the options at all.
Just a tiny correction, the official Google documentation specifies NOT using parentheses. I have verified this and this filter method works fine with the syntax deliveredto:username@example.com as specified near the bottom of this page:
https://support.google.com/mail/answer/7190?hl=en
Just for completeness, I should explain that Gmail ignores some characters in email addresses. It ignores periods for example – in other words myname@gmail.com and my.name@gmail.com are treated exactly the same by the Gmail server. I assume that the parentheses are ignored similarly.
Thank you for creating the article!
Oh, interesting! Thanks for taking the time to let me know — I’ll update the article and screenshots to match soon 🙌
One question…
Under “Filters and Blocked Messages”, what are the check boxes for? The checks don”t stay when I leave the page. Do they need to be checked?
Those don’t need to stay checked — they’re for selecting multiple filters if you wanted to delete (or export) more than one at a time. They should be unchecked by default 😊
thx!!
Np! 😎
Thank you very much!!
You’re welcome! Thanks for taking the time to share a comment 🫶
Even simpler is “Size greater than 7 bytes” and “Size greater than 8 bytes” or whatever small numbers you want. Each one will be processed.
Oh, true! I hadn’t thought of doing it that way — neat idea 💡
Thanks a lot! Now it finally works for me too! Although instead of “deliveredto:xxxx@gmail.com” for me it worked with only “to:xxxx@gmail.com”. Anyways, huge thanks!
No worries! Just be careful with that setup — it won’t forward emails sent CC or BCC (only the ones with your forwarding address in the TO field)
Jess:
I simply cannot get this to work. I’m prevented from VERIFYING more than one FORWARDED address in the first place. I never see DISABLE FORWARDING.
Can you please help?
That sounds to me like you haven’t clicked the verification link yet — the email you have added as a forwarding address should have an email with subject line:
“(Gmail Forwarding Confirmation – Receive Mail from [person@email.com])”
Within that email you need to click the verification link under:
“To allow [person@email.com] to automatically forward mail to your address,
please click the link below to confirm the request:”
Once you’ve clicked that link, it ‘activates’ the forwarding, which in turn shows up the option to disable it again. Hope this helps!
Do you need to include parenthesis around the main email address?
e.g. deliveredto:(email@gmail.com) vs. deliveredto:email@gmail.com
Yep, you do — the rule should look like your first example:
deliveredto:(email@gmail.com)
Good luck!
So mine will forward to 3 other addresses but for some reason it won’t send to mine no matter what I try. I’ve deleted, re-added, re-confirmed, set up the filter again and still won’t come to me even though it’s going to everyone else? Not in spam, no clue what to do. My email address is the secondary “admin” email from the Google admin console for this account, do you think that has anything to do with it? What else can I try?
Hmm you’re allowed up to 20 addresses, and I don’t think being the secondary email would affect it.
Slightly annoying but I would suggest:
1. First, have someone ELSE send a test email to the forwarding email to see if theirs comes through to you?
2. If that doesn’t work, can I check that you: deleted the filter first, THEN deleted the forwarding address, and THEN went back through the process (add forward address, accept/confirm within that email’s inbox, setup filter)?
2. If you already did it in that order and it’s still not working, try set up some OTHER email to check that it’s an issue specific to your email address
3. If the OTHER email doesn’t work, then it must be something within the ‘forwarding’ email settings, but if the other email DOES work, then it must be something specific to your email settings — I would have assumed spam, but if it’s not there can you do a search for the test email you sent?
Beyond that, I’m stumped! Hope you can get it working 🤞
This is tremendously helpful. Thank you! There are many forwarding instruction links on the Internet, many of them don’t really get the job done, or don’t explain the steps properly. While your short video was good and compact without fluff (unlike many others), this page is even more helpful, because I can actually stare at one of your screen captures for a minute and let it sink in. Thanks!
BTW, I’d say one important difference for using the filter is that you preserve the original recipient. Now when I receive a forwarded e-mail, it would still show the original recipient’s e-mail in the “To” field, so I can tell it is a forwarded message, instead of directly sent to me.
Thanks for taking the time to leave such thoughtful feedback! And I’m glad it could help you 🤗
Thank you!!! Wow, I searched and searched for a way to do this, and read a ton of articles and “How tos” and none worked until this!
In fact, I think it’s working even better than described because in order to reply to everyone, I don’t need to add the forwarding email into bcc, I just need to hit “Reply all”, which adds the forwarding email to the “To:” line and then sends the reply to everyone. So great! Thanks again!!
Woohoo!! Thanks for taking the time to let me know, so glad it’s working for you 😄
I’ve been very frustrated trying to set up multiple forwarding. Your excellent instructions were easy to follow and now everything is working the way I wanted. Thanks for posting.
I’m so glad to hear it! Thanks for taking the time to leave a comment and let me know 😊
This is really bizarre, but I’m finding this isn’t working with forwarding to other gmail addresses. Have created filters for other @’s and it works perfectly. Whenever i make a filter to another gmail account nothing happens. Any suggestions? Thanks so much!
How bizarre! I’m using it to filter/forward to multiple Gmail addresses, so I know it works. A couple of things to check: did you use “deliveredto:(xxxx@gmail.com)” in the filter? And if so, did you check the spam folder for confirmation email to accept forwarding for each of the recipients? Perhaps try removing those forwarding addresses and starting again, making sure they accept the request for forwarding before setting up the filters using those addresses, ie. to ensure the forwarding is ‘approved’ before the filter is created. Good luck!
Thank you SO MUCH!!!! That is so incredibly helpful!!!!
Yay! You’re so welcome – thanks for taking the time to let me know 🥰
Very helpful, thank you!
You’re welcome!
Jess, this is really great. Very ingenious! Thank you. One thing I noticed though, if an email is delivered to the SPAM box, and then you click “not spam”, and it automatically moves to the INBOX, the filters do not seem to be triggered, and no forwarding occurs.
Oh, dang! I hadn’t spotted that issue. I check the spam folder from time to time but have always manually dealt with those ones as part of the triage process – I suppose you would also need to manually forward them 😕
I was pounding my head against the wall knowing I was missing something. Well done you. Thanks
So glad it was helpful! Thanks for taking the time to leave a comment and let us know 😄
Thank you SO much for writing out this article. I looked for quite a while to find a free email forwarding service, but this is even better.
Why use filtering, if the same capability seems to already exist via Forwarding though? instead of disabling it, can you you not just set up Forwarding to multiple email addresses? Otherwise, I don’t understand the advantage of using filters over forwarding.
My pleasure! The inbuilt forwarding only offers redirection to one email address at a time (or at least, that was the problem I was trying to solve for when I wrote this article!) — hopefully one day they change it so it doesn’t require the hacky workaround 🙃
Yes! This was the problem that was stumping me, too. Great job solving it!!
Hi, the information was very useful! I have one more question. I set up multiple emails to forward, now the filter notice is stating it will end in 7 days. Can I get it not to end? thank you =)
You’re welcome! The filter will keep working after 7 days — the notice is a security feature that appears for 7 days so you know that the emails are being forwarded, but it will keep working once that notice disappears.
Hello – I am a volunteer and our website host offers free account forwarding. Basically, we defined a fake email account – information@xxxx.org that our hosting automatically forwards to our actual email – xxxxinformation@gmail.com. We then want to forward those emails from xxxxinformation@gmail.com to a few board member’s personal email accounts. I cannot get it to work. I tested multiple scenarios and the set up as you described works in multiple situations but will not work with a ‘bounced’ forwarded emails. Do you have any ideas or should we just give up?
Thanks –
Hi there! Did you use “deliveredto:(xxxxinformation@gmail.com)” in the filter? And if so, did you check the spam folder for confirmation email to accept forwarding for each of the recipients? I believe it should work for ANY email delivered to the address, regardless of whether it was forwarded/bounced or sent directly.
You could do a test by setting up regular email forwarding from xxxxinformation@gmail.com to just one email address to make sure the forwarding function is working, and if it is, turn that off again and try the filter method again. Good luck!
💞💞💞This worked! Thank you so much! I cannot find the solution to this problem in youtube or anywhere until I found yours. I made sure I copied and pasted it in my OneNote. Your tip has truly simplified most of us here.💖💓💖
So glad it’s working for you, thanks for taking the time to let me know! These comments make my day 🥹🫶
Thanks so much Jess. I am so going to use this!
And coincidentally I’m interested in producing too so will be checking out more of your stuff
But your site seems very slow? It might be me but…
Hope that helps
Thanks for the feedback, Ed! The site IS slow but we haven’t had a chance to diagnose and figure it out, hopefully soon 🕵️
Thank you!
Great article, now gonna surf this web, looks useful!
Cheers!
Thanks so much, glad it could help! There are a few other articles with Gmail specific tips over here if that’s your jam 💁♀️
can you forward emails to other addresses other than gmai? I have 2 members who use yahoo, and it does not appear to work
Sure can! They may need to check it hasn’t gone into their spam/junk folder?
Worked for me 2 after at little struggle, thanks for sharing.
I simply used the gmail adress itself in the “Has the words” so every email is forwarded to all in our board.
1 thing I don’t get is the “deliveredto” couldn’t find that anywhere.
Ah, I’ve just updated the screenshots to better explain where that should go. The way I’ve set it up is to use “deliveredto:(youremail@gmail.com)” in the “Has the words” field (to ensure it catches BCC and CC emails, as well as the regular ones).
Hope this makes sense!
Thank you Jess!!
Just added 2 people – it works perfectly!!
Easy to follow instructions, love the screen shots!!! You Rock – what more can I say!
Comments like this really make my day!! So glad it was helpful, thanks for taking the time to let me know 😄
I searched the entire internet looking for the way to do this multiple forwarding thing – could not find it ANYWHERE until I found your tutorial. (Even my tech-y friends didn’t know how to help.) I followed your clear steps and it works! Thank you! (P.S. It looks like there’s a ton of other useful stuff on your site as well.)
Hey, thanks for taking the time to drop a comment and let me know — it really made my week!! 🥹🫶
I am not receiving the verify email from Google, I followed all of the steps and it is not working for me 🙁
Oh no! A couple of things you could try:
– Double check that the email is typed in correctly
– Look in your ‘spam’ folder in case it’s been stuck there
– Delete from the list of forwarding addresses and re-add
If those things don’t work, I’d suggest trying with another forwarding address (just to see if you get the validation email that way), and if it doesn’t come through, contact Gmail support to help you out. Good luck!
Hi. I’m having trouble setting this up. I need to forward emails to myself and two other people. Do I have to add all three of us in the “Forwarding and POP/IMAP” section and then also in the filter section? Any help would be appreciated. Thanks
That’s right! You need to add each email individually under “Forwarding and POP/IMAP” (and make sure all three have ‘accepted’ the request to be added as a forwarding address), THEN add each email individually as a filter. Hope this helps 🤞
So I have done this but one email keeps getting dropped from forwarding list and I have to re add them every day. What would cause this? I am using a gmail account to forward to them and their account is a gmail account
What a pain! I’ve never heard of this happening before. I know the limit is 20 forwarding addresses, so it could be happening if they’re number 21? Or if they haven’t ‘accepted’ the request to forward emails? I’d suggest heading to the ‘Forwarding and POP/IMAP’ settings page, REMOVING the forwarding address and trying to re-add from scratch (making sure they accept the new request to accept forwarded emails). Good luck! 🤞
This isnt working for us.. any ideas as to why?
A couple of things you can check:
1. That the forwarding address has been added AND accepted — there’s an email confirmation you need to accept at that receiver address before it’ll allow that address to be used in the filter.
2. That the filter is formatted like this: deliveredto:(you@email.com)
If both of those things are in place, then you might need to try removing and re-adding the forwarding addresses AND filters (the old “turn it off then on again”!)
i don’t even receive a confirmation — it just allows me to add the addresses, but still doesn’t work
It might be worth double checking that the confirmation emails haven’t gone into a spam folder? Then perhaps try removing and re-adding the forwarding addresses?
I used your method to set-up an “all-staff” email to be used internally. I haven’t found a way to set-up a group for emails in Google Workspace. If there’s a way to do that, I just don’t know it. Thanks so much!
Ah, yeah so we use this filter method for alias style emails but you can also use ‘Google Groups’ to setup addresses that will go to specific team members — this relies on all of the emails being managed by the same Google admin account (whereas the filter method can go to anyone, inside or outside the org). Perhaps check out the Google help docs for more info on their group setup process if that will suit your needs, it has other handy benefits like being able to add the group to a calendar event and it’ll automatically add all individuals 💅
really wanted to this to work with cellular providers, ex. forward to “my-cell-phone”@verizon.net… but I don’t think there is a way to verify the send.
Ahh, yeah unfortunately I don’t think it’s possible for those. Alas!
You’re awesome! I was hoping it would work and following your steps it worked perfectly.
thank you!!!!!
Woo hoo! Glad to hear it. Thanks for taking the time to let us know!
Still working now, thanks a lot!
Woohoo! Glad to hear it, thanks for letting me know ☺️
Is there a limit to how many forwarding addresses you can have or the amount of filters you can set?
I believe the limit is 20, but I haven’t actually tested this limit myself — it might have changed since the help documentation was last updated!
How long does it usually take for this to take affect? I’ve set it up about an hour ago and have been sending test emails, but none are getting forwarded. Thanks so much in advance!
Hmm if it’s setup correctly, it will work straight away — have you checked that the forwarding address has been added AND accepted? There’s an email confirmation you need to accept at that receiver address before it’ll allow that address to be used in the filter. If that’s all hunky dory, then check that the filter is formatted like this:
deliveredto:(you@email.com)
Hope you can get it working!
Hi, is there any updates for this one, bcus it doesnt seem to work for me, ive tried using the field “has the words” and fill it with “deliveredto:(email)”
please suggest, thx
Hmm I’ve just sent a test email with my own account and it’s still working — did you do the first step of adding the email as a forwarding address? You need to do this but then DISABLE forwarding: what that does is allows you to use that email as a forwarding address within the filter, if that makes sense. Hope this works! 🤞
Thanks! this was super helpful and just what we needed … sincerely appreciated, from snowy Canada
Welcome, you are! Stay cosy ☃️
Thanks, but how do you delete the emails after the forwards? Are the forwards going to be done in the order listed always? Is it safe to put \”delete it\” on the last forward filter?
Sorry for the slow response! It\’s up to each recipient to delete their own — for our purposes, we keep a copy in the original mailbox then sweep through and bulk delete every so often.
I haven\’t tested using a \’delete\’ forwarding filter at the end, but I suspect they do run in order, so that could be a smart approach! I\’d love to hear if that\’s what you ended up doing, and if it worked?
Worked like a charm! Do you have any post on how to auto bcc/cc emails for gmail?
We don\’t have that setup —just doing it manually for now— but it looks like there are browser extensions that could do the trick for you! e.g Auto BCC for Gmail
This works great EXCEPT when the e-mail is sent to me as a BCC – then Gmail does not recognize my e-mail address in the \’To\’ field and does not forward it. Any tips here?
Sorry for the snail-paced reply, I’ve only just spotted this! You could try changing the filter so the “Has the words” field uses “deliveredto:(me@email.com)” — although perhaps you’ve figured this out by now? How did you go?
The regular forwarding worked, but the bcc didn’t 🙁 any thoughts as to why? Thanks so much for helping my husband and me share the mental labor of our household!
Hmm a couple of things to double check:
– Filter uses “deliveredto:”?
– Emails aren’t going to the Spam folder of BCCed address?
– The BCCed address has ‘accepted’ the original request to be a forwarding address?
If all of those things are in place it should work, but if still no joy you could try adding some extra parameters to the filter as below:
deliveredto:me@email.com AND -to:me@email.com AND -cc:me@email.com
Sharing mental labour is so important! Hope you can get it up and running 🤞
Me sirvió de gran ayuda para un proyecto que estamos llevando a cabo entre dos personas. ¡Mil gracias!.
¡Eso es genial! ¡Gracias por la nota!
Thank you! This is exactly what I needed.
Fabulous! Hope it\’s still working out for you 🙂
Thank you so much. This was a great help
Glad to hear it, thanks for letting me know!
This was super helpful, thanks for sharing with the world!
You’re welcome Juan! Thanks for taking the time to leave a comment 😊
Thanks for the information. Came just in time!
Phew! Glad it was helpful. Thanks for letting us know!
Not working. Looks like Google plugged that hole.
NM. Working
Ah yeah, it can be slow to come through but as long as Gmail continues to offer forwarding and filtering, hopefully it keeps working!
It would be even better if they offered forwarding to more than one address as an option in the regular forwarding feature 😬
Thanks, It’s really working
Woohoo! That’s great news, thanks for letting us know 🙂
Thank you! This was extremely helpful!
That’s so nice to hear, Mia! Thanks for taking the time to let us know 🙂
I’ve been thinking about which other problems we’ve solved that might be helpful to write about, so hopefully there will be more to come!
Thank you so much for putting this guide together!
You’re welcome Kaycie! I hope it all makes enough sense to follow along. I guess I tried to write the post I wished existed when we set up ours 😉
This is exactly what I was looking for 🙂 how does it work when you reply to an email?
Someone sends you an e-mail to weareproducingparadise@gmail.com, all of you get it. However, one of your staff members replies to that email from their personal account (not weareproducingparadise@gmail.com… then what happens? Do all of you see the reply or just the original sender?
In our setup, we tend to either:
a) Reply from our own email address, and BCC weareproducingparadise@gmail.com so everyone can see that it’s been dealt with; OR
b) Login to the dedicated Google account for weareproducingparadise@gmail.com, and reply from there (if we want to keep our personal email address private).
It depends on what it’s about / who we’re responding to.
Pro tip: If you don’t want to get logged out of your personal Google account, most browsers offer a Private browsing option (e.g. in Chrome go to File > New Incognito Window) which can be used if you need to quickly login to another account.
Hope this helps!
You also have the option to “Send mail as:” weareproducingparadise@gmail.com from your personal account. That way you can avoid logging almost all together. That option is under Accounts and Import
Oh, that’s a great idea – I’m going to add this to my own setup now, and will update the post to include this suggestion at some point too.