
How we use: Trello for to do lists
If you’re asking yourself ‘what on earth is a Trello?’ then this is the post for you! Learn how to use Trello for managing your to-dos.
Summary: Trello’s visual boards are an easy way to organize tasks and collaborate. It’s flexible and works well for both personal and team projects.
Update (June 2025): Still my go-to when Notion feels like too much. Trello’s simplicity holds up, especially for visual thinkers and quick task lists.
What is it?
Trello is a project management tool: something you use to get sh*t done. I’ve used a range of these in my time, including Basecamp, Wrike, and JIRA for digital project management within a team, then Wunderlist and Workflowy for lo-fi personal task management. There's also Notion, Monday, ClickUp, and Todoist which are all worth a look. While each have their own special powers, Trello stands out as it Does One Thing Well… and it’s free! At least until you need the fancy paid features, but there’s plenty you can do without them.
Maybe you've heard of it or maybe you haven't. Either way, I'm here to help you learn how to use Trello!
In this video (15min), I walk you through how to start a Trello board from scratch to manage personal to-dos, including the task status options I recommend and a few pro-tips 🤓
Here's what's covered:
00:10 Why choose Trello?
01:55 Create a board
02:18 Change background image
03:19 Suggested list setup (for task status)
04:39 Add a 'card' (AKA add a task)
07:26 Update task description
08:30 Might do vs must do tasks
09:53 Add calendar 'power-up'
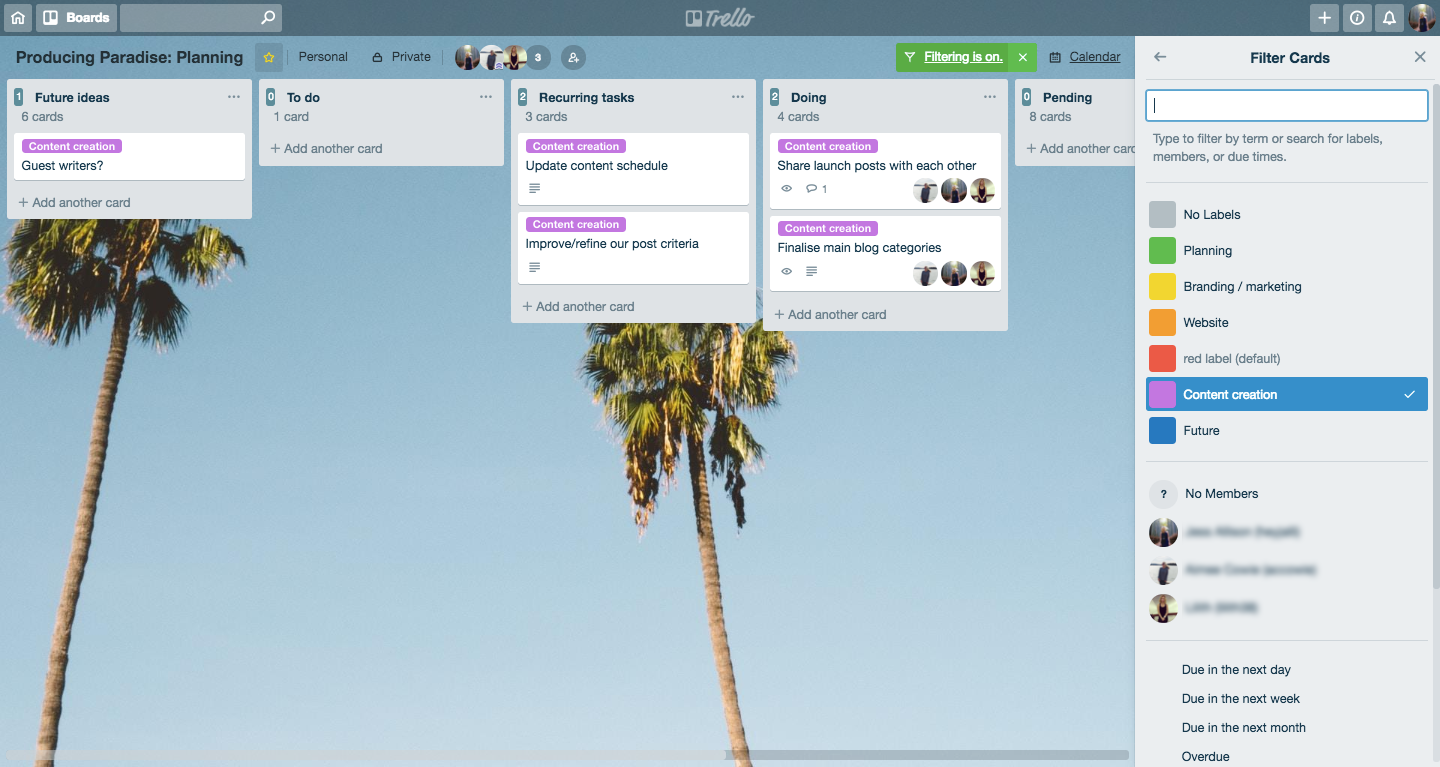
10:32 Using labels
11:55 Using labels to filter tasks
12:42 Keyboard shortcuts
13:32 See all tasks (across all boards)
If Trello feels a bit limited... you’re not alone. We now use Notion for task and project management because it gives us more flexibility, custom views, and built-in workflows. It’s a great next step once you’ve outgrown Trello.
Personal vs work related tasks
I used to use Trello to manage both personal and work related tasks but this comes with a word of warning: I strongly advise you to keep the two accounts separate.
Personal email → personal Trello account
Work email → work Trello account
Even if you’re the only one using Trello at work. Even if you’re really good at keeping your personal and work life separate. And maybe even if you’re a freelancer, although that’s a grey area. The distinction between the “things you’re doing for yourself” (personal) and the “things you’re being paid to do” (work) is important: they’re two very different modes, and I find it helpful to be able to login to the right account when I’m in the right headspace (and perhaps place/time) for each.
Trello 101
Trello is based on a board, list and card system. It can be used in oh-so-many ways but here’s how I do it:
A board should represent a particular project, or act as an index of sub-projects
Each board contains multiple lists (there are many different ways to set these up but I like to use a list per status on project boards, or a list per category on index boards
Each list contains a number of cards, where each ‘card’ represents a single ‘task’ (more on that later!)
The best way to explain how this works for me is through which projects (‘Trello boards’) I have in which account:
| Personal Trello Account | Work Trello Account |
|
Personal to-do board I call this my ‘life admin’ board, and use it for nagging tasks like my tax return, preparing a will, getting my wisdom teeth out, and sorting old photo files… whatever is relevant at the time |
Personal to-do board This is where I keep track of all my work to-dos if they aren’t specific to a particular project. |
|
All projects board This board is used to capture new ideas, current projects, and potential future projects (which may have been started then put on hold). It acts like an index of all my personal projects, with links to the dedicated project boards if they exist. |
All projects board This board contains all of the projects we have running in the studio, including client work and internal projects (like workshops we’re running, or the company website). We use it for a high level overview of which team members are on which project, and an easy way to click through to the dedicated project boards from there. |
|
Producing Paradise: Planning board An example of a current project: this blog! The ‘Producing Paradise: Planning’ board is where we keep track of our blog tasks, and who’s doing what. |
Individual project boards Each project has a dedicated board shared with the whole (internal) project team, and containing all the tasks relevant to that project. |
|
Our house board My boyfriend and I share this board to manage our house admin (like bills), new ideas (like getting a beehive), house jobs (like getting a quote for a new front fence) and the bigger cleaning jobs (like the fridge or oven). |
Getting started
If you’re ready to give it a go, I recommend starting with one board for a single project — perhaps something small, or your personal to-do list.
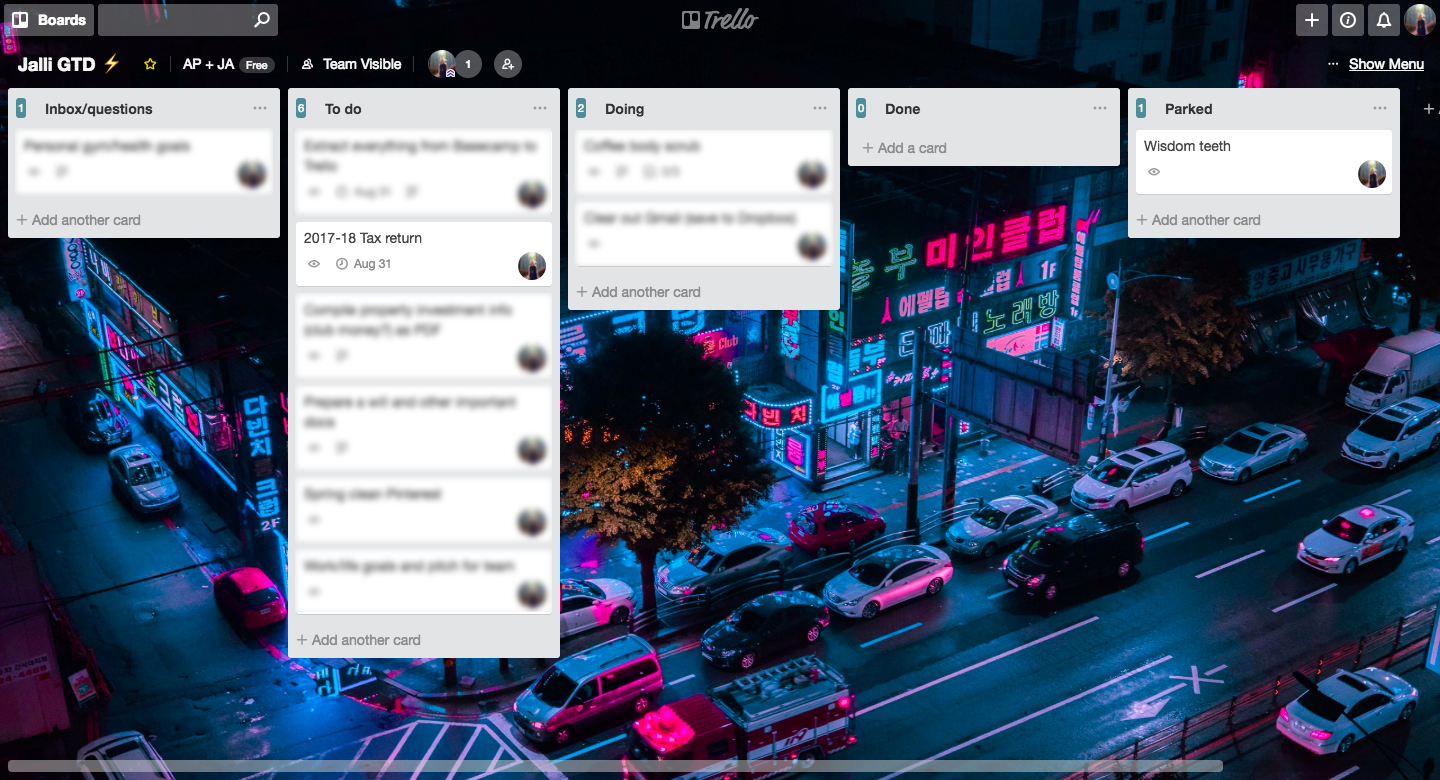
The simplest way to setup a new project board is with these basic lists:
Inbox/questions
To do
Doing
Done
Parked
Jess' Trello board for personal to-dos: basic edition
If you find your lists are getting unwieldy, with too many tasks, you might try these instead:
Ideas to be scoped (might do)
Not started
Next up
In progress
Recurring tasks
Paused/pending
Done
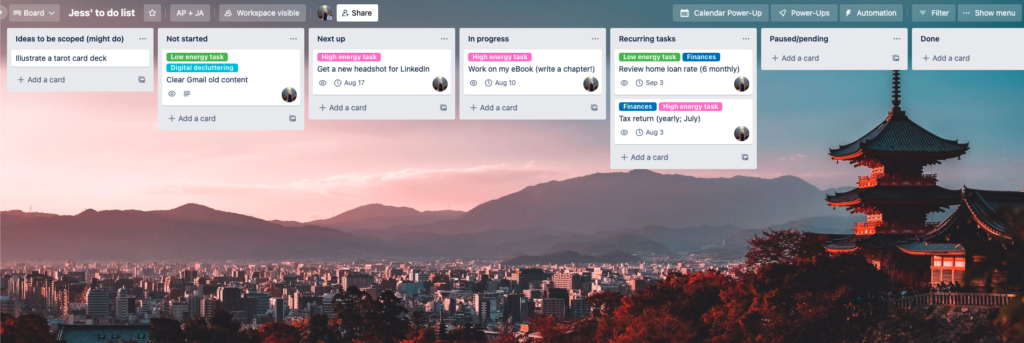
Jess' Trello board for personal to-dos: large task list edition
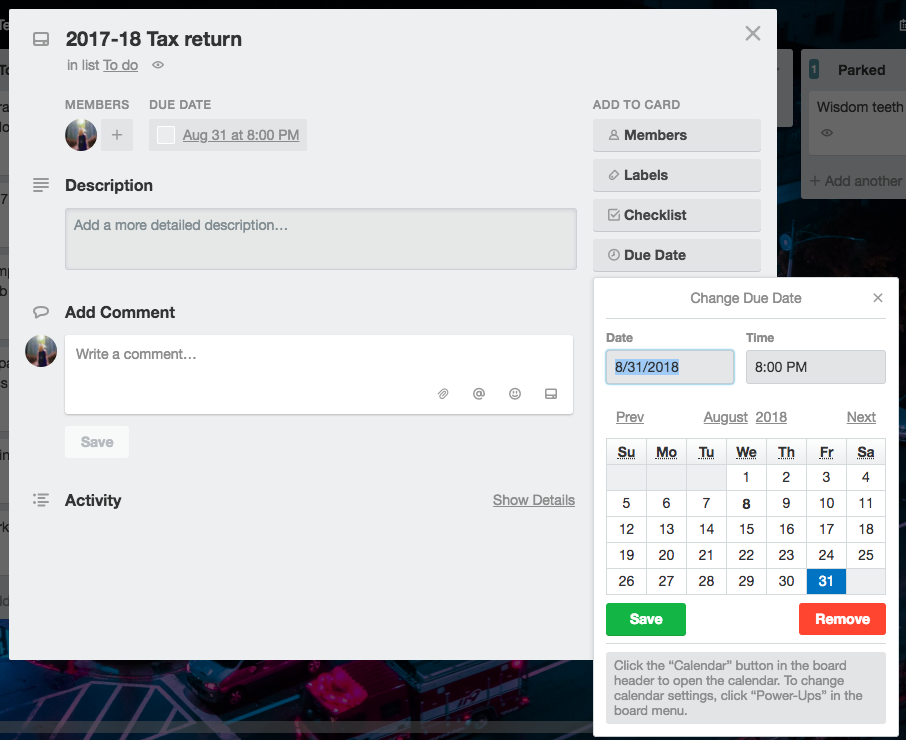
Put in all the bits and pieces you are responsible for then ‘add yourself’ to those cards. If any of those tasks have a deadline, use that as the ‘due date’. If they don’t have a set deadline, but you want to give yourself a timing goal, set the due date to that instead.
If there are others involved, add their tasks next until you’ve covered everything the project is going to need. Think of it like this: the Trello board should be the source of truth for the project and capture every single task you know is (or might be) required. The system works best if everyone on your internal project team is part of the board, but it can be useful to set it up and get a feel for it by yourself first.
Cards as tasks
Each ‘card’ should represent a single task, question or event which can be completed on its own — ❗this is important, so you can move it along the line when it’s in progress or finished, and to avoid any card being half-finished or only wanting to assign ‘one aspect’ of it to someone. When you’re first setting up a project, the task list might be quite broad but they can be split into more granular tasks/cards later.
Don’t be afraid to create as many cards as you need, just be sure to name them in a way that will make sense at-a-glance (or to someone else, if you’re going to be sharing the board). Short, clear card titles are best.
Customising your board
Once you get the hang of it, you can start adjusting the setup of each board to suit each project — for example, we’ve added lists for ‘Future ideas’ and ‘Recurring tasks’ to our blog planning board.
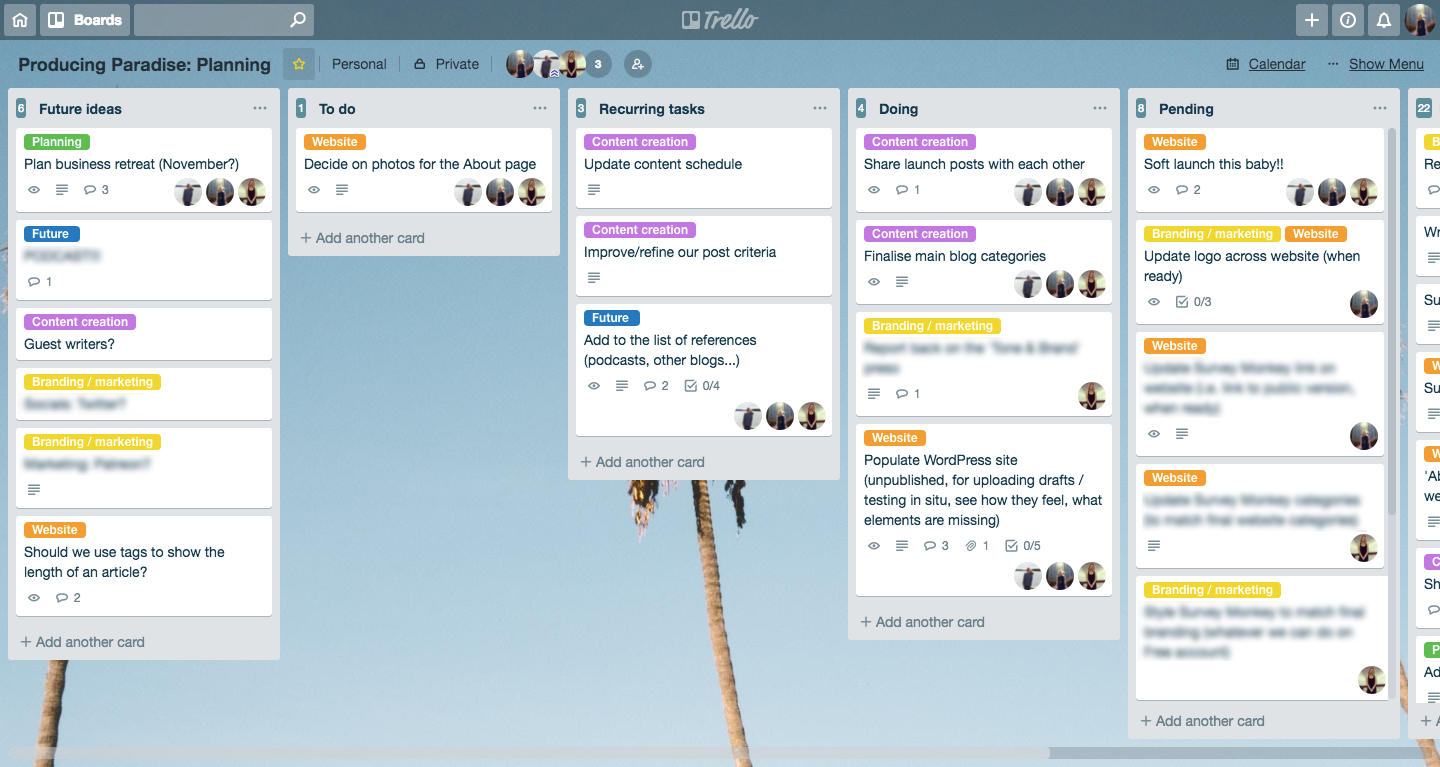
You can also use labels as a means to organise and filter your boards — for example, we have a ‘Content creation’ label.
Pro tip #1: See all your tasks at once
This took me far too long to figure out: you can see all the cards assigned to you from across all boards on the same page, you just need to know how to find it! 🔎
Either click on your avatar in the top right corner then ‘Cards’, or go to https://trello.com/[your_Trello_username]/cards (and bookmark it).
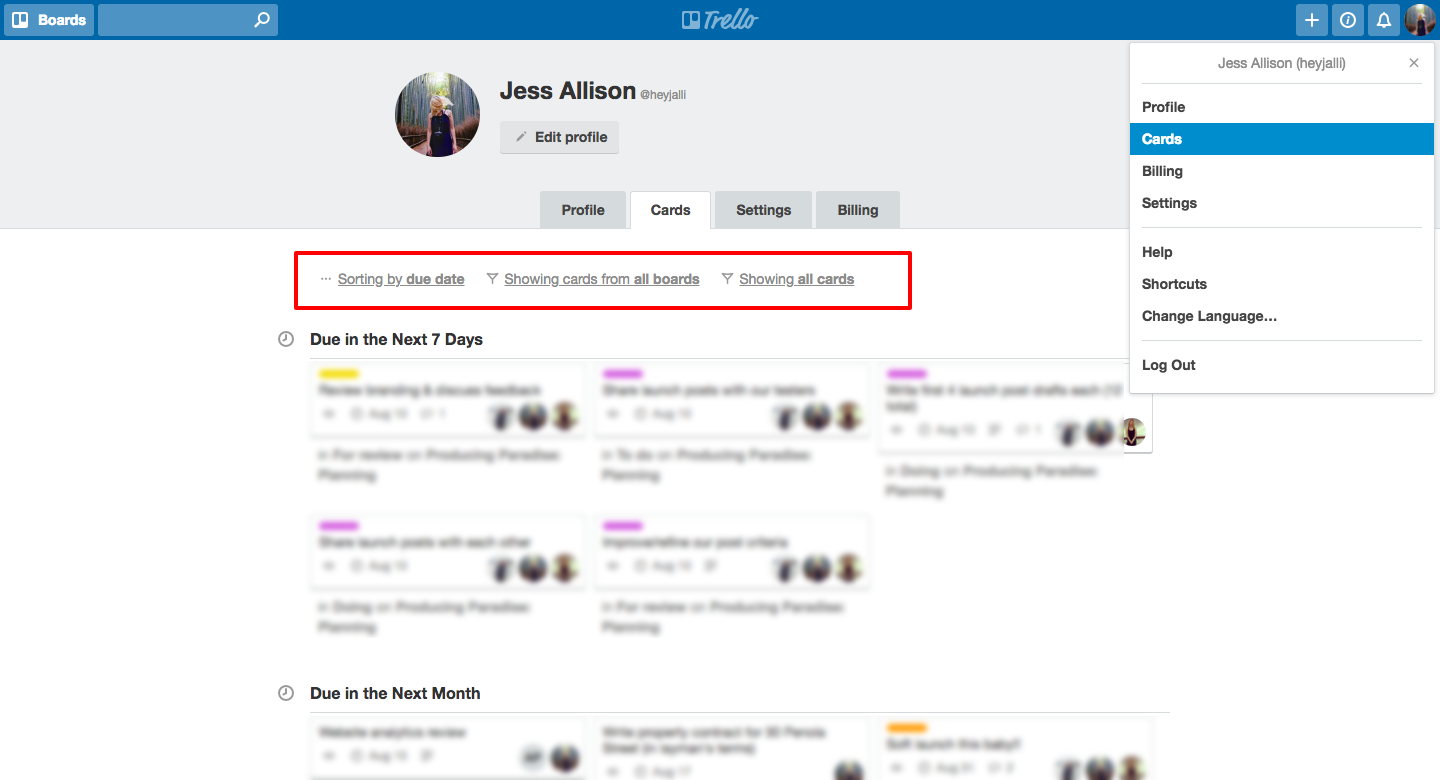
To make sure you’re seeing everything, change the settings on this page to:
Sorting by due date
Showing cards from all boards
Showing all cards
Pro tip #2: See all your tasks on a board
Go to the board and click ‘Q’ on your keyboard — that’s the shortcut for a quick filter of the board to only show the tasks you’re assigned to. Click ‘Q’ again and it’s back to normal. Magic! ✨
Further reading
Here are some articles to help get you up and running:
And some example boards for inspiration:
Then some more advanced tips for seasoned Trello users (or enthusiastic newbies!):
🖇️ If Trello is not your jam, maybe one of these other options will work for you:
Use this referral link to try Todoist for free
Use this referral link to get started on Monday’s free plan
Use this referral link to get started on ClickUp’s free plan
Move beyond basic task management
Learning to use tools like Trello is a great first step, but building comprehensive systems for your entire workflow can transform how you manage your creative business.
Could you use a central hub that goes beyond to-do lists?
The Organised Creative Operating System is a Notion template to manage projects, track client work, and organise your ideas in one integrated system.
EXPLORE THE TEMPLATE →
How about systems that create space for what matters?
The Most Organised Person I Know shows you how to design simple systems that reduce mental load and help your work flow more smoothly, from daily tasks through to long-term projects, at work and at home.
GET THE EBOOK →
Turn task management into systems that support your whole life.
This post contains affiliate links. This means we may earn a commission if you purchase services through these links without any extra cost to you. This commission helps us keep the site running. We appreciate your support!